| Simple Graver Forming | ||||||||||||||||||||||||||||||||||||||||||||||||||
| home Link to other tutorials copyright 2010 Jim Kelso | ||||||||||||||||||||||||||||||||||||||||||||||||||
| Recent works To Archives & Jewelry | ||||||||||||||||||||||||||||||||||||||||||||||||||
|
||||||||||||||||||||||||||||||||||||||||||||||||||
|
||||||||||||||||||||||||||||||||||||||||||||||||||
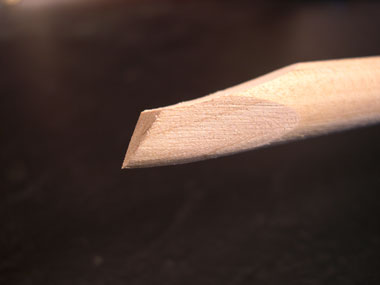
A stumbling block for many wishing to try engraving is simply getting a functional point. Although I learned graver geometry using the Crocker sharpener as outlined in James Meek’s book, The Art of Engraving, I have come to rely on a much simpler approach shown to me by Leonard Francolini. It does not involve the use of any jig or fixture and is not complex. I am not interested in critiquing any mechanical aids as some may find them useful, and I think there are much more useful jigs these days than the Crocker. I would like to add that this approach, I feel, is in no way a compromise in tool formation but is the type of point I use for a large percentage of my engraving cuts. It is not difficult to produce and once formed is quick and easy to keep sharp without having to move to a separate sharpening station. Below are a series of photos showing the process of forming the point on a wooden dowel. I would recommend buying a hardware store dowel and moving through the steps before forming a steel tool. This will allow you to see the point taking shape in 3D and will make it easy to grasp the elementary basics of making an effective graver/chisel point. This will be very helpful, I think, as you learn, through experience, how to imagine and create other useful tools for your needs as they arise, without relying on mechanical aids which may or may not be available for the tool you imagine. I would recommend to start with round drill rod either carbon steel or HSS. If you are familiar with hardening steel use 01 or W1 for the simplest heat-treating. HSS will not have to be re-heat-treated and is recommended for those not experienced with the heat-treat. There is much information available on heat treating and it is not my aim to go into it here. I am only covering the making of the point form. I am also not going to cover the elementary tool forming skills of filing or grinding. One will need to develop some skill in those to shape the steel. Once the tool is formed it can be used in any of the usual ways: 1) mounted in a handle for chisel or palm engraving, 2) chucked in an air-assist handpiece. The point can also be formed at the end of a one-piece longer blank such as the Japanese tagane. There are 4 important geometrical elements to this point1) belly, 2) face straight, 3)bottom edge straight,4)face angle symmetry. The single most important aspect is the sweeping belly. Without this the point acts more like a nail and will simply bury itself into the metal. Actually any of these can be off some and the tool will still cut, but not well. This approach of a sweeping belly can be adapted to many other forms of points such as flat chisels and round bottom gouges. To summarize, I prefer this type of tool because: 1) Easy to form and maintain tagane drawing ikideshi
|
||||||||||||||||||||||||||||||||||||||||||||||||||
|
||||||||||||||||||||||||||||||||||||||||||||||||||