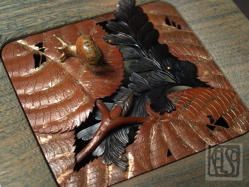
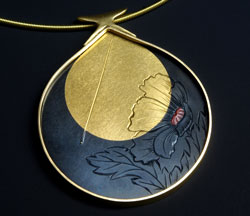
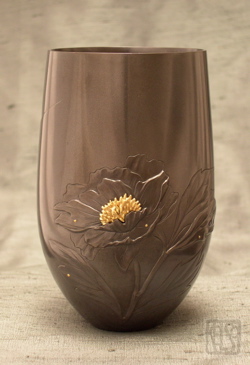
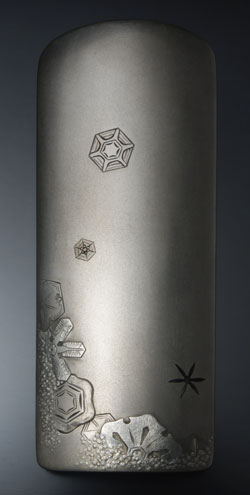
This is an introductory primer on my use of the Niage technique developed in Japan to patinate(color) the traditional Japanese alloys, primarily shibuichi, shakudo, pure copper and other copper-based alloys. These alloys have gained popularity outside of Japan in the last few years. There is however little available instruction on the attendant traditional Japanese patination process in English, based on practical experience in the studio.
It should be clearly understood that the classic colors seen on these alloys on, for example, Japanese sword fittings, were obtained by use of the alloys, but always in conjunction with precise (though variable) chemical formulas. The colors are the result of both the alloys and the chemical patination. To be sure, some coloration can be obtained, sometimes pleasing, with other than the traditional formulae, but in my experience, this is often random and in many cases those colors might just as well been done on pure copper or Sterling silver. It is not my wish to criticize these other methods, but simply to present the traditional technique in the hopes that some will find it useful in producing the wide variety of color possible using Japanese alloys, in a precise predictable way.
I feel a few words of caution are necessary. Any processes involving chemicals, heat, finely ground powders, etc are inherently hazardous and it is assumed that practitioners will be familiar with standard jewelry practice involving these types of materials. I will accept no responsibility for any mishap involving the information presented here.
I will attempt to delineate where the information given is based on my own practical experience, otherwise it is from written or oral transmission. There are bound to be differences of opinion and experience in any such complicated and variable endeavor, based on regional and personal preferences. I use the techniques described here because they have worked for me. I don't believe they are necessarily the best or only techniques, and I'm happy to hear of others' experience.
Some may also feel that this knowledge should remain a mystery. For better or worse, we live in a different time than Edo Japan. There is a very real danger of these techniques fading into obscurity, through lack of use. It is always those who practice a technique who are in the best position to carry it on and perhaps even add to it. I was given this information freely and generously and my own feeling is that there is mystery enough involved in these traditions to counterbalance the risk of dilution and corruption by a free distribution. The more people using them the better.
My motivation is not to present the be-all/end-all treatise on the subject, but to provide a working body of knowledge sufficient for the enthusiast to obtain reasonably predictable results. In the end, it is results that count and my hope is that this presentation will allow some few an easier entry into a complex but potentially rewarding field.
My sources:
I began using this process about 1985 when I was sent printed details, compiled by Al Ching, based on a workshop given by Satsuo Ando in California. I had good results from that information which is essentially the core of what is presented here. I visited Toshimasa-sensei in 1987 and he gave me further details and a demonstration. Further information presented here has been gleaned from many varied sources, but I would like to thank, in particular, Satsuo Ando, Professor Hiramatsu: Tokyo University of Fine Arts, Phillip Baldwin, Mark Morgan, Eugene and Hiroko Pijanowski, Toshimasa(Masaichi Sakai), and Ford Hallam. The input from each of these individuals has been helpful and in some cases indispensable to my ability to produce the results I obtain today. We owe an immense debt of gratitude to all those preceeding us who added to and refined this body of knowledge.
PREPARATION
There are primarily three major considerations contributing to the successful patination of Japanese alloys. These are 1. surface preparation(stoning & polish), 2. cleaning, and 3. the actual boiling process, and each of these will be covered in detail.
The first step toward patination(also to be considered coloration) of a piece of metalwork is the preparation of the project surface. This assumes that all decorative engraving, chasing and decorative processes are already finished. The preparation of the metal surface involves the final polish and cleaning.
STONE AND PAPER FINISHING
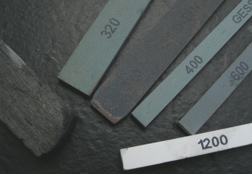
A precursor to the polishing process that I have found useful (but not necessarily essential) is the use of finishing stones. This is a process little understood in the US outside of the tool and die making industry. It is well understood in Japan, these days especially in the sword polishing field. As far as I know, there is no better way to achieve the best possible, even surface without dips and ripples. It's my experience that commercially available tool and die makers' stones, selected for non-ferrous, work extremely well on copper and the Japanese alloys. It's a matter of practical experience as far as selecting the proper grit and shape, but successive use of 220, 320, 400, and 600 will present a very suitable surface for the polishing to follow. There are no short cuts, and time used trying to "skip a step" is usually wasted when you find you have to back up anyway. The time-honored method of varying directions with each successive grit applies here as well as anywhere else. At present, I'm using the Gesswein "Moldmaker Stones" up to 600g and then the "Ultrasoft" 900g just before moving to the horsehair brush and powder. Stone size is whatever works for a specific project. In general I like 1/8" x 1/4". Various natural stones are available, including the Water-of-Ayr
Scotch stones. These can be very enjoyable to use, but can be difficult to locate and are limited to a narrow grit range, without, in my experience, any appreciable advantage.
POLISH
After stoning the surface to 800-1200 finish, I will back up to 600 then 1200 wet sandpaper to remove all stone scratches. A this point these fine papers will not cause or promote dips and ripples but will prepare the stoned surface for the final polish. It may seem counterintuitive to back up in grit size, but in practice, this seems to work best for me. Finishing the papering to 1200 seems to set the surface up for a minimum of polishing in the next step.
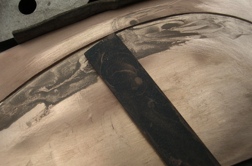
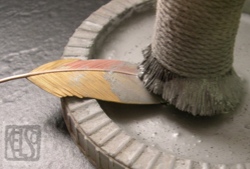
I have found the traditional Japanese polishing technique using a horsehair brush(migaki-bake) with suitable powdered abrasive and water to be indispensable in achieving the finish necessary to produce reliable, satisfactory results in the steps to follow. Traditionally, the powdered abrasive used was powdered charcoal of different species, most often honoki(Magnolia) . I've found that finely powdered(800g) silicon carbide is a very effective replacement for basic charcoal .I am also currently using 1200 grit silicon-carbide, always using a separate brush for different grit size. It's my belief that the effectiveness of the brush and abrasive in preparing the metal surface is due to two distinct properties of this method. Firstly, the abrasive is carried quite effectively into every recess contributing toward a uniformity of action. Secondly, the circular, omni-directional action of the brush also contributes to uniformity. Perhaps others have had success with conventional jewelry polishing, but my results with buffs and compound were very mixed.
To begin the polishing process, a slurry is made of the abrasive and water, in some suitable shallow container that allows free access and doesn't restrict wrist movement. It does take a certain amount of "elbow-grease" so adopt a position that allows you to relax as much of your upper body as possible. With the brush charged with the slurry, the work is scrubbed in tight circles, paying close attention that the action is consistent and even over all surfaces, especially deeper recesses of carving or inlay. Each workpiece will call for a little different set-up to most efficiently hold and polish it. This is easily worked out logically. It's not necessary to have the work sitting on the bottom of the holding dish. Fatigue is a factor so try to find the most comfortable, relaxing position and take stretching breaks. It doesn't take long to see results. I keep a second, deeper container near, to rinse into as I progress and check results. If you keep your containers away from possible contamination, the slurry can dry out and be reused, I would think nearly indefinitely. The silicon carbide powder does break down and become finer with use. Also, the brushes become softer with use, becoming less aggresive.
Experience will teach you when you have achieved a polish that will yield the desired result in the patination bath. I look at the polished surface with a slight magnification and varying light conditions to be sure I have removed all scratches from previous stoning. Being abrasive, the silicon-carbide does leave minute scratch paths, but with 800 grit, these are largely negated during the patination process. The circular pattern contributes to the effect as light is reflected from all directions. I've found it impossible to achieve this effect with sandpaper, even with finer grit. The effectiveness of this technique is due, I believe, largely to this omnidirectional action, imparted by the circular motion of the brush and it's ability to reach all areas.
A finer polish can be obtained using charcoal powder, but I would suggest gaining proficiency with the synthetic powder first. A separate brush should be used for different powders.
CLEANING
It's vitally important to get the piece as clean as possible, especially free of oils and grease. This is another reason to not use the usual grease based jewelry polishing compounds, especially in work with inlays, as they are very likely to get in the tiniest of voids and ruin the patination. I do the final cleaning as close as possible to immersing the work in the patination bath. I don't think it's possible to overstate the importance of thorough cleaning. My cleaning sequence would run: After I'm thoroughly convinced that the polish is satisfactory I remove all traces of pitch on the back. I then wash the piece with "Fantastik" as recommended by the Pijanowskis. I'm sure there are other cleaners that will work as well. I would avoid anything heavily scented. You can use a soft toothbrush to aid the cleaning. After a thorough washing I rinse with baking soda in water, being careful not to abrade the work. From here out I try to handle the piece as little as possible and only with tissue (unscented). I try to have the patina bath just hitting a boil as I finish the cleaning so there is as little time as possible between the cleaning and the patina bath.
From the cleaning, it's on to the daikon, then into the bath as described below.
PATINATION (see Materials & Sources below)
The move from the cleaning stages to the patination should be as seamless as possible with as little time as possible between. This necessitates having all materials ready for the patination. The materials you need for this are:
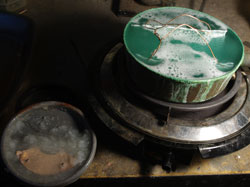
1. heat source(hot plate, gas burner or stove-top)
2. copper pan of suitable size to hold the piece in a copper or plastic basket. I believe glass will work as well, but it is likely that the action of the copper in the pan contributes to the effect. I would not use "stainless". The copper must be not tinned, and if seamed the joint should be hard-silver-soldered. It must be thoroughly cleaned before the first use. As the pan is used repeatedly a deposit of rokusho will build up on the pan. this is desirable, as long as it does not become contaminated, and in fact, it's probably a good idea to "season" the pan by boiling a batch of solution for an hour or so, previous to a patination effort.
3. Distilled water. I always use distilled water because our well water is very hard and I would recommend narrowing down the possible ways to go wrong as much as possible.
4. Daikon radish. Found in natural food stores and some grocery stores or Asian grocery stores depending on your location. Some sources indicate that Daikon juice is only used when silver is used in the work, to prevent yellowing and some indicate it's not necessary at all. I always use it. By the time I get to this stage, considering all the time spent, it's a small thing to grate it and use it. I also enjoy the herbal aspect of the process/ritual. Sources differ on whether to use the juice or the pulp. I've used both with equal success. You don't want a lot of pulp going in the bath although small amounts don't seem to matter. Perhaps initially on a small piece, using just the juice is easier. 2-3 minutes immersion is fine and I use a Q-tip to move air bubbles so that all surfaces of the piece are equally effected. I haven't heard the definitive reason that Daikon is effective, but it is alkaline so perhaps there is a slight "etching" that prepares the metal surface nicely. It also is a grease cutter so adds to the cleaning process.
5. Holding basket. I use a basket I made from copper screen. Heat resistant, non-reactive, plastic should work as well, but I don't have personal experience with it.
6. Tongs. Bamboo works well as long as it is kept clean.
7. Gram scale
8. Mortar & pestle
The chemicals you need are:
1. The proprietary rokusho from Japan(see suppliers)
2. cupric sulphate
3. In some cases alum and plum vinegar are used to amend certain colors, but are not necessary for the basic process.
I have seen formulae for "rokusho" here and there but have never tried anything but the real thing. My feeling is if I'm going to invest lots of time and sweat in a piece why take short cuts to save a dollar or two.
The first step is to weigh, grind and mix the chemicals. Proportions vary depending on the primary alloy being colored. I use these two formulae, nearly exclusively:
1. for copper and shibuichi as the primary metal: 4 grams rokusho/3.5 grams cupric sulphate in 2 liters of water(distilled)
2. for shakudo as the primary metal: 8 grams rokusho/5grams cupric sulphate in 2 liters of water From here, cupric sulphate will be referred to as the Japanese term "tampan".
The water quantity is less important than the proportion of the chemicals to each other. The water seems to be largely a medium in which the chemicals work. I like to weigh and grind the tampan first as it needs a fairly vigorous grinding to break it down. I then weigh the rokusho and add it to the tampan, and grind them together. You'll notice that the tampan goes into solution whereas the rokusho does not. This is normal and expected. It does mean that if the mix sits for even a minute, the rokusho will settle to the bottom, and requires that when you pour the mix into your pot for boiling, you must stir it up vigorously just before and perhaps actually spoon some of the rokusho from the jar. Store in glass jar. I have used the mix immediately after mixing, but a good practice is probably to mix it an hour or two ahead or to mildly heat it to dissolve the tampan thoroughly.
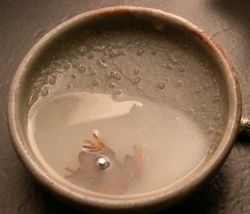
Assuming the workpiece is thoroughly polished and cleaned, it is immersed in the daikon juice/paste for 2-3 minutes just previous to immersion in the boiling niage bath. I usually start heating the pot as I'm grinding the daikon so everything can move along quickly after the final cleaning. This requires having your chemicals mixed well ahead of time.
After the daikon treatment the piece is placed in it's holding basket and immersed in the boiling bath. The bath should be just above the boiling point and not allowed to drop below boiling when the piece is in. This means you need to have hot water ready to add to the bath as it boils down. The piece should absolutely not be allowed to reach air and dry out. In the first minutes I usually shake the basket to keep air bubbles from adhering and preventing the solution from reaching the metal. You need a rinse container near to check progress as it's difficult to judge well when the piece is in the bath.
It's amazing to me how variable the timing can be. At best, sometimes 10 minutes or even less can be sufficient. Usually it's more like 20 minutes, but up to 45 or sometimes more. You can see well enough in the bath to tell if the color is coming. It's a matter of experience with pieces with multiple alloys to know when the optimum color is. Sometimes the shibuichi looks great and the shakudo needs more, but you run the risk of yellowing the shibuichi with too much time. You can check the color in your rinse bath making sure to move the piece quickly enough to the bath not to let it dry and being sure not to touch it.
When you are satisfied with the color, place the piece in the rinse bath and cool it as you rinse. You must not let the work dry quickly while it's still warm from the bath as this will leave chemical residue and possible anomalies in the finish. I like to work a little baking soda into the carving and deep recesses if there are any, letting the baking soda run in the rinse water over the entire piece. You can very lightly use a soft toothbrush to aid in the rinse in deeper areas. The idea is to get all the rokusho out from the carved area where it will tend to stick and bleed out from later. The baking soda can act as a mild abrasive, so go gently, not rubbing.
When the piece is well rinsed, I make one last check to be sure I'm happy with the color. At this point it can be reintroduced to the bath, if you want more color, but once it's dry and you handle it, it must be cleaned again before reintroduction to the bath. If it looks fine, I like to let it sit undisturbed, for a day or so, out of direct sunlight, but in ambient light, to let the color "set". I'm not sure if this is really necessary. A light coat of Renaissance Wax can be applied. This is a PH neutral conservator's material and seems to have a good reputation. It will leave a whitish residue if allowed to dry in crevices, so be sure to wipe thoroughly before it dries or you will be going over all the carving with a toothpick.
My body oil seems fairly neutral, but care must be given when handling as some will be more reactive than others. This patina is very stable and durable, given a moderate level of care.
MATERIALS & SOURCES
1.copper pan: copper pans are not so readily available and affordable that you can easily and cheaply buy a selection for many size works. I have found a source for unlined pans which I will show below. Obviously everyone will have different needs as to size. I would suggest that you solder(hard silver-solder) up your own as needed to have a selection based on your needs. This will economize in the long-run with your use of chemicals. If you buy a pan, be sure it is copper on the inside and not stainless clad. I also keep my eyes open at yard sales and antique shops for old pans.
1a. copper or plastic basket: the holding basket/sling is also size dependant on the work. Some resourcefulness will be needed. Whatever plastic is used must be chemical and heat resistant. Shown below is a source for PTFE(teflon) mesh from which holding apparatus can be constructed.
2. rokusho: Reactive Metals Studio(see below) or Tagane Arts
3. cupric sulphate: Reactive Metals Studio or chemical supply houses
4. Stones: Gesswein
5. Silicon carbide powder: Gesswein or Advanced Abrasives Corp.
6. Migaki bake: Jim Kelso
7. gram scale: Gesswein or other jewelry making supplier
8. bamboo or plastic tongs: Gesswein or other & oriental grocery store
9. Alum: often found in a pharmacy
10. Daikon radish: found in many grocery stores, Asian groceries or natural food stores.
11. Umezu(Plum vinegar): Asian groceries or natural food stores
12. Alloys: Reactive Metals Studio
SOURCE CONTACTS
1. Reactive Metals Studio: www.reactivemetals.com - tel: 928-634-3434
2. Paul Gesswein & Co: www.gesswein.com - tel: 203-366-5400 3. Advanced Abrasives: www.advancedabrasives.com
4. InterNet-Netting for Industry(for PTFE teflon mesh): www.internetmesh.net - tel: 800-328-8456
5. MetroKitchen(for copper pans): www.metrokitchen.com - tel: 888-892-9911 Look for the Mauviel Copper Sugar Sauce Pan with Spout in various sizes.
|